In the absence of a router or wired Ethernet cable, you have two PCs that you want to connect to each other either for networking or file sharing purposes, what do you do? Do you suspend file sharing till some other time? Or you take the alternate method of connecting two PCs wirelessly as listed in the easy steps below. Creating an ad-hoc network is an effective way of connecting two windows PC, as long they have the required WiFi hardware. An Ad-hoc network, also known as computer-to-computer or peer-to-peer mode permits direct communication between two or more devices in the absence of a router. Connecting 2 Windows 10 PC via Homegroup is also another effective means of file sharing. On previous versions of Windows OS (Win 7 and 8), setting up an ad-hoc windows hosted network is quite straightforward and easy. On Windows 10, things get a bit complicated and slightly technical. It’s, however, easy though — given you follow the steps correctly.
How to connect two Windows 10 PCs without a router
- On your Windows 10 PC, launch your Command Prompt as an administrator. You can easily do this by holding the “Windows + X” key in your keyboard and select “Command Prompt (Admin)”.
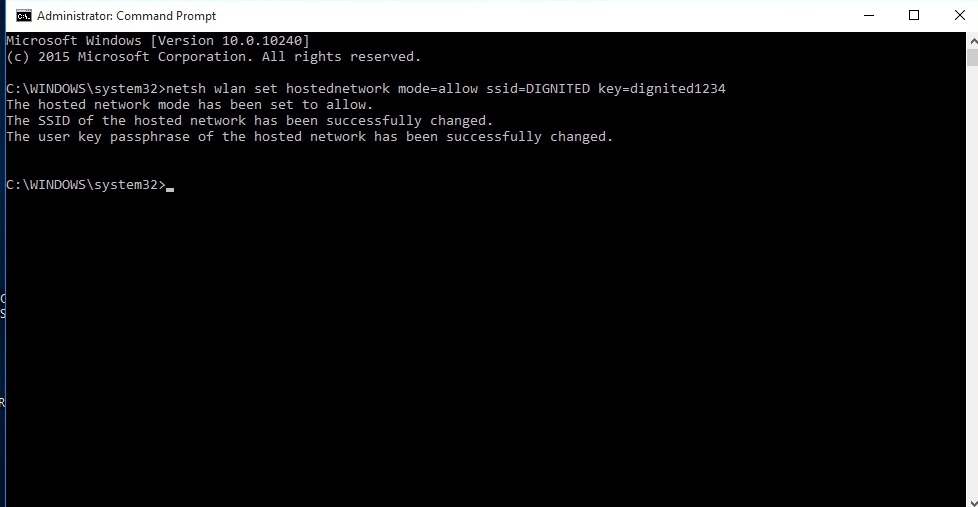
- Once Command Prompt is launched, type in the commands as follows: netsh wlan set hostednetwork mode=allow ssid=network name key=password The italicized and red-colored variables can be whatever you want them (your network name and password) to be. E.g netsh wlan set hostednetwork mode=allow ssid=DIGNITED key=dignited1234
- Click the “Enter” key on your keyboard
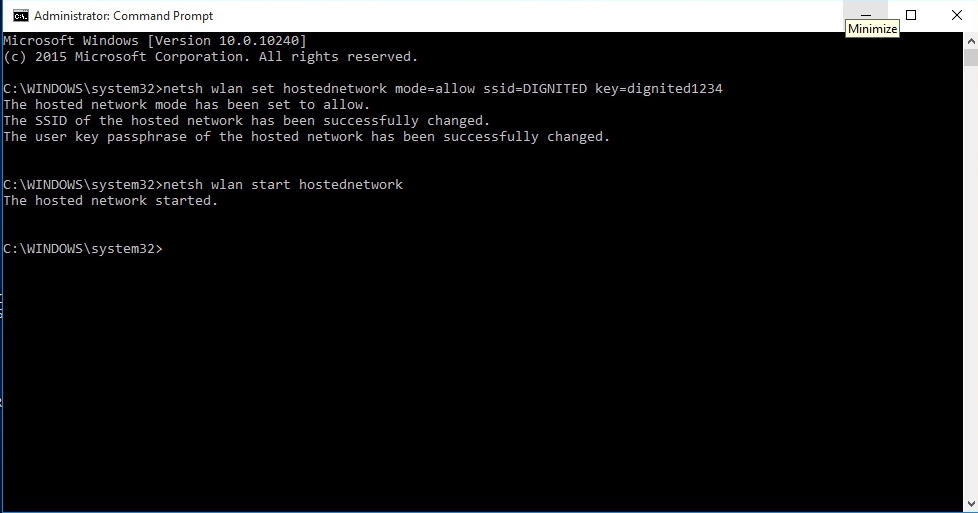
You would receive a prompt informing you that the hosted network has been created, its mode set to ‘allow’, with the parameters (SSID & passphrase) you imputed. 4. Next step is to start the newly created hosted network using the command line below: netsh wlan start hostednetwork 5. …and click Enter on your keyboard
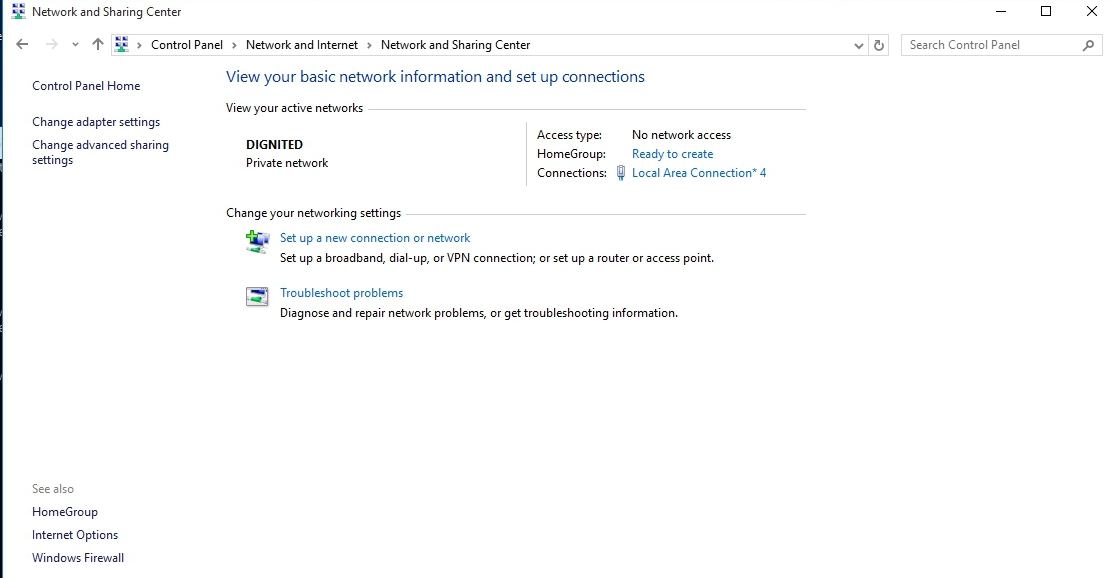
If imputed properly, “The hosted network started” is the response you should see on the CMD Prompt’s dashboard. 6. To confirm if the hosted network has truly been created, Open your PC’s Control Panel » Network and Internet » Network and Sharing Center You should see the new hosted network under the ‘View your active networks‘ heading.
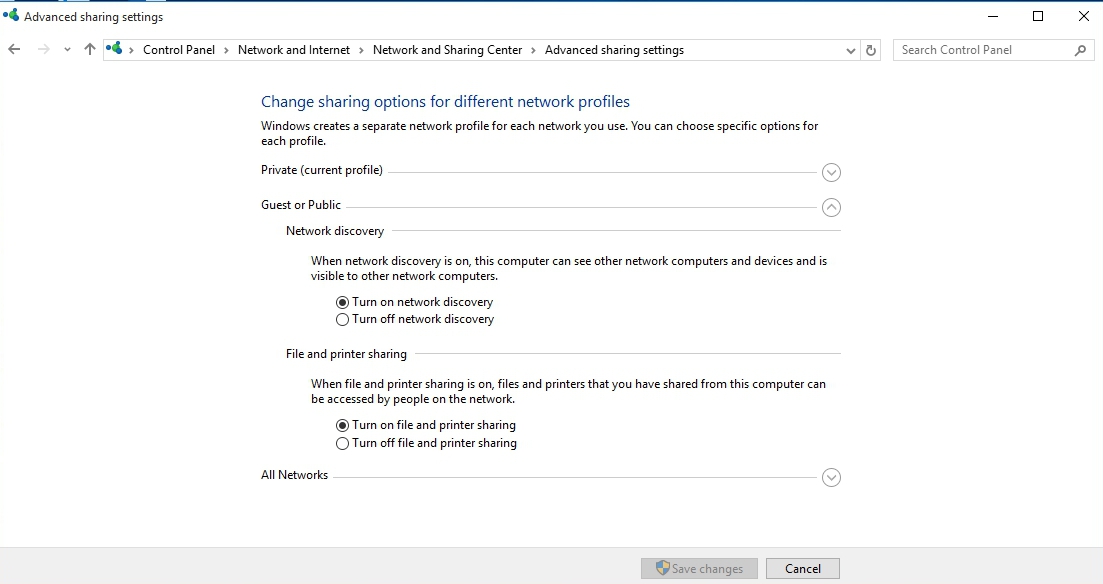
In the image above, the newly created ‘DIGNITED’ network can be seen visibly under the active network menu. 7. On the second PC (PC 2 hereinafter), open the WiFi menu and connect to the ‘DIGNITED’ network as created by the first/host PC (PC 1). Input the hosted network’s passphrase to continue. 8. Next thing to do is set file sharing permissions on PC 1 to be able to share, copy, and send files between both computers wirelessly. Navigate to: Control Panel » Network and Internet » Network and Sharing Center » Change advanced sharing settings
- Turn on “network discovery” and “file and printer sharing”
- On PC 1, PC 2’s Local Disk should now appear as the second local disk.
- To access the content, right-click on the Local Disk » select ‘Share with‘ » then ‘Advanced Sharing‘ » Check the ‘Share this folder‘ box » Click ‘Apply‘
- Both local disks are now accessible on the two connected computers. However, if you want to access PC 1’s local disk from PC 2, you be required to enter PC 1’s computer ‘username’ and the PC’s password (not the network password). Tried this? Did you successfully connect your Windows 10 PCs? Got any questions? Drop them in the comments box below. Or you can watch the video embedded below for clarification.


